


 How do you define school supplies?
Of course there are the ubiquitous backpacks, pencils, crayons, rulers, scissors and all the other quintessential necessities for the classroom.
But what if we expand the accepted definition of "school supplies" to include what children tote around in their lunch boxes? The lunchroom is just as much of an educational setting as the classroom and the lunchbox is a powerful tool that can either help or hinder your little one's lunchtime experience.
How do you achieve optimal lunchbox success? Here a few tips to help you get started.
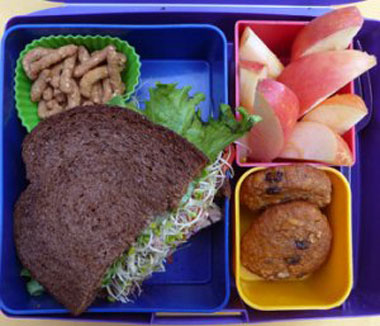
· Choose brightly colored fruits and veggies to create a visually pleasing plate
· Make sure all food is kid-friendly size so it is easy and fun to eat
· It's not all about the food; packaging can be just as important! Check out the new bento box lunchboxes for kids (and adults); brightly colored and differing in sizes so as to help with portion control
· Step out of the box when it comes to the ever-present sandwich; use cookie cutters for fun shapes or just scratch the sandwich entirely and try meat and cheese roll ups!
· Have your children help you pack the lunchbox; the more your children participate in food preparation, the more likely they will be to eat what is in their lunchbox
Your colorful, creative and (hopefully) collaborative lunchbox will make your child the star of the lunchroom. Gone are the days of trading mushy bananas for a shrink-wrapped twinkie.
"The kids are loving this program! I know they are cooking the recipes at home because they come back to school the next day and tell me about it!!" says a 5th grade teacher at EA Jones Elementary
Recipe for Success' integrative Seed-to-Plate Nutrition EducationÔ teaches kid-friendly recipes, easily adapted for the dinner plate or the lunch box.
Make your child's lunchbox "lunchroom ready" with the following Recipe for Success recipe.
A Recipe for Success: Paprika Cauliflower Pita Pockets
Serves 4
Ingredients:
1 head fresh cauliflower (2 pounds), cut into bite-size florets
3 tablespoons olive oil
2 tablespoons sweet Hungarian paprika
½ teaspoon ground black pepper
½ teaspoon fine sea salt
1 medium red onion, diced to = 1 cup
1 clove garlic, minced
½ cup low-sodium vegetable broth
2 tablespoons lemon juice
4 pita bread rounds, halved and warmed
Process:
Assemble and measure all your ingredients to create a mise en place
1. Using a saucepan with steamer insert set over high heat, add cauliflower, cover and steam for 7 to 9 minutes, or until fork tender.
2. Remove cauliflower to a colander or strainer and set aside to drain.
3. While cauliflower is cooking, set a non-stick skillet over medium low heat.
4. Add olive oil, paprika, pepper, and salt to the skillet and sauté, stirring constantly for 2 minutes, or until fragrant.
5. Add onion and garlic, to the skillet and sauté 2 minutes longer.
6. Stir in cooked cauliflower and broth to the skillet, and simmer 3 minutes.
7. Remove skillet from heat, and stir in lemon juice.
8. Allow to cool.
Serve inside pita halves for a nutritious lunch.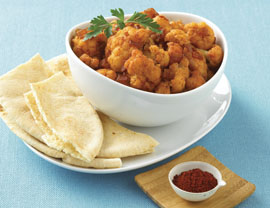 Get Adventurous!
· Try adding fresh tomatoes, chopped black olives, and some low-fat Parmesan cheese to the stuffed pita pockets.
· Experiment with using different seasonal vegetables in place of cauliflower.
· Add any leftover filling to a salad. It's just as good cold!


Have a question?